
This feature is currently available to selected customers in a closed beta.
This guide walks you through pushing your Master Content to Amazon, step by step.
Step 1 — Set up your Data Connections
-
Vendors: Go to Data Connections, enter all your Vendor Codes, and select which account(s) should be used for the push.
-
Sellers: Your account details are populated automatically — no extra setup needed.
Step 2 — Create and save your Master Content
Open the Content Monitor, review and adjust the content so it reflects your desired product presentation, and save it as your Master Content.
Note: An ASIN must be on Daily Tracking to be pushed. ASINs on Weekly Tracking cannot be pushed — change the tracking frequency in the catalog settings first.
Step 3 — Identify content deviations
|
Status |
Meaning |
|---|---|
|
✅ Green checkmark |
Live PDP content matches your Master Content |
|
❌ Red cross |
Live PDP content deviates from your Master Content |
|
⚪ White bubble |
Both Master Content and PDP content are empty |
Step 4 — Create a queue and select items
Create a new queue in the Content Monitor, move the items you want to push into it, and select them.
Step 5 — Push to Amazon
-
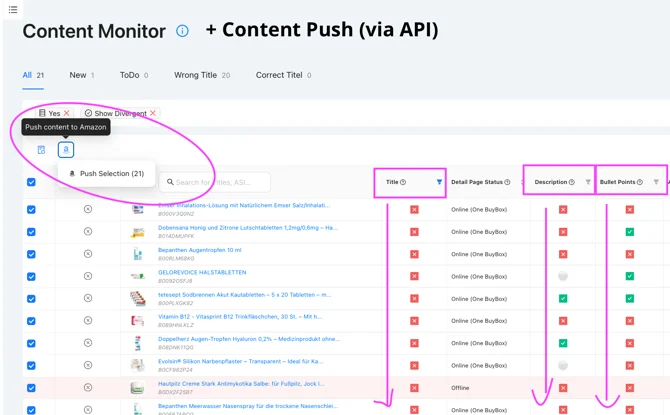
Click the Amazon icon in the toolbar.
-
Choose which attributes to push (Title, Description, Bullet Points).
-
Click Validate Selection to run a pre-push check.
-
If validation passes, click Push to Amazon.
You can push multiple ASINs at once (Bulk Push). Each ASIN is validated individually — items that fail validation are marked Failed, while valid items are still pushed.
Step 6 — Verify the result
A "Done" status confirms the content was technically transmitted to Amazon — it does not guarantee Amazon will display it. Watch the Content Monitor over the following days: items that adopt your Master Content switch from a red cross to a green checkmark, typically within 1–2 business days. If nothing changes, see Troubleshooting & Error Reference.