This feature is currently available to selected customers in a closed beta.
What is Content Push?
On Amazon, every product has a single Product Detail Page (PDP) — no matter how many merchants sell that product. Amazon itself, your brand, and multiple third-party sellers may all share the same PDP, and any of them can suggest changes to the title, bullet points, description, or images shown there.
As a result, the content displayed on a PDP often differs from what you intend to present to customers — without you noticing. Tracking these deviations and correcting them manually (through vendor managers and support tickets) is slow and time-consuming.
Content Push solves this. You define your Master Content — your authoritative version of the product content — in the Content Monitor, and send it directly to Amazon via Amazon's Feeds API with just a few clicks. No manual support tickets, no workarounds. Content Push is the logical extension of the Content Monitor: detect the deviation → correct it → push it.
Who can use Content Push?
Content Push is available to both sellers and vendors. You must be the Brand Owner of the products you want to manage and registered in the Amazon Brand Registry, with at least one Seller or Vendor account connected to the tool.
The setup differs between the two account types:
|
|
Seller |
Vendor |
|---|---|---|
|
Identifier used for the push |
Seller ID (retrieved automatically) |
Vendor Code (must be entered manually) |
|
Setup effort |
Low — works once SP-API is connected |
Higher — all Vendor Codes must be entered |
|
Bullet Point limit |
up to 10 |
up to 5 |
If you have both a Seller and a Vendor account connected, you can choose which account(s) to use for the push — seller only, vendor only, or both.
Vendors: You must enter all of your Vendor Codes in Data Connections. Amazon requires a valid Vendor Code + SKU combination to verify the push is made on your behalf. Missing Vendor Codes are the most common cause of validation errors.
Prerequisites at a glance
|
Prerequisite |
Seller |
Vendor |
|---|---|---|
|
Active SP-API connection |
✅ |
✅ |
|
Brand Owner + Brand Registry |
✅ |
✅ |
|
Vendor Codes entered in Data Connections |
— |
✅ (required) |
|
ASIN set to Daily Tracking |
✅ |
✅ |
|
Master Content available in Content Monitor |
✅ |
✅ |
|
Content Push enabled in Data Connections |
✅ |
✅ |
Which attributes can be pushed?
|
Attribute |
Limit / Notes |
|---|---|
|
Product Title |
max. 200 characters |
|
Bullet Points |
Vendor max. 5, Seller max. 10 — no promotional claims, no external links |
|
Product Description |
Some product types ignore Description (e.g. certain fashion/wearable categories) |
|
Images |
Available as a separate closed beta — see Image Push [Closed Beta] |
Note: A+ Content (Enhanced Brand Content) is not part of Content Push. A+ Content has its own dedicated process and must be managed directly in Seller Central or Vendor Central. Content Push covers PDP text attributes (and, in a separate beta, images).
Where to find your Vendor Codes
If you're preparing to push your Master Content as a vendor, you'll need to provide all of your Vendor Codes first. These codes are unique identifiers assigned to your vendor account(s) within Amazon. They tell Amazon which catalog content belongs to which vendor when you push or update content. Without them, your product content cannot be matched or published.
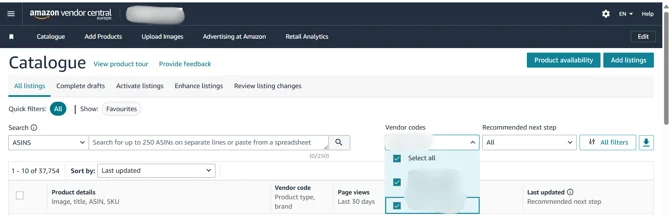
To find your Vendor Codes inside Amazon Vendor Central:
-
Log in to your Vendor Central account.
-
Open the main navigation menu (top navigation bar, or the left-hand menu depending on your interface version).
-
Go to Catalogue. This section contains all product and vendor-related data associated with your account.
-
Inside the Catalogue section you will see a list of your vendors. All your Vendor Codes are displayed here — these are the codes you need to enter in Data Connections.